Barista-Approved Tips For Making Beautiful Latte Art

It's the small things, like delicate flowers or hearts on top of your latte, that can brighten an average morning routine. If you're trying to save money by skipping the cafe and making coffee at home, you can still make your own pleasing designs on top of your drink. To learn about the tricks of the trade for latte art, Food Republic spoke with Jee Choe, Specialty Coffee Association trained barista and writer of the blog "Oh, How Civilized."
Choe tells us that "getting the right consistency with foaming milk" is key for beautiful latte art. What you want is microfoam, or steamed milk with very small air bubbles. This fine foam makes for a more luxurious mouthfeel, pourable consistency, and designs with clear outlines. Choe uses a steamer with an attached wand and metal milk jug, and advises to start with cold milk.
After dipping the wand just below the surface of the milk, heat it up gradually and "listen for the 'psst, psst' sound, which sounds like paper ripping," she says. This is your cue to plunge the wand in deeper at an angle (so air bubbles don't just form at the surface). Heat the milk until the outside of the jug is hot to the touch. Choe emphasizes that achieving the right consistency really comes down to practice. You want to avoid milk with lots of large bubbles, or your latte art will come out looking like a blob, and won't taste as creamy.
Practice makes perfect latte designs
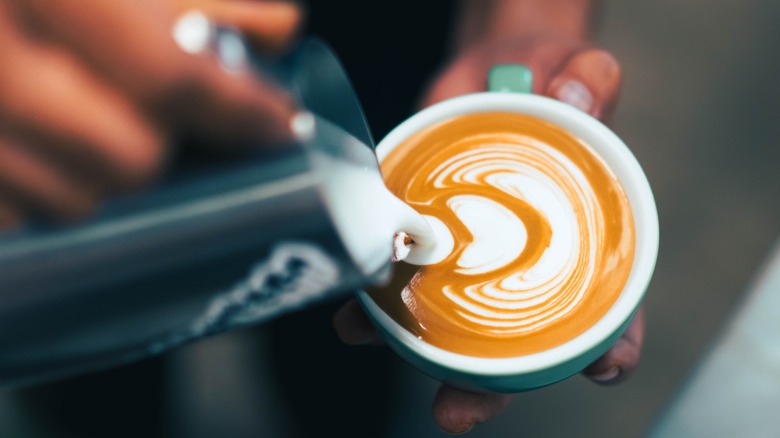
It takes patience and plenty of attempts to get used to steaming milk like a pro, and the act of pouring out latte art designs largely involves muscle memory, too. It's key to tilt the cup of espresso towards yourself at a slight angle as you pour in the steamed milk, so it combines well with the coffee. Then, just as the cup starts to get full, tilt it back into to an upright position and top it with your microfoam design. Hearts are usually the easiest to draw for beginners, before you get into more complex drawings. With enough practice, you can add designs onto other espresso drinks, like a dry cappuccino.
At this point, you might be wondering: How do you avoid wasting espresso and milk? You can't very well drink every latte you experiment on, unless you practice only once a day on your morning cuppa. Jee Choe's solution is to use some instant coffee whisked together with steamed milk to "create contrast between the milk in the cup and the milk in the jug." The light brown liquid makes for a perfect base.
Choe also recommends reusing the same steamed milk multiple times when practicing, instead of tossing the milk after each attempt. That way, you don't have to make a whole new shot of espresso or go through cups and cups of milk. "Nailing latte art can take time, so don't rush and keep practicing!" she reminds us.
Other tips for making latte art at home
Do you lack a bunch of fancy barista equipment, or maybe you can't drink dairy milk? Don't be deterred from trying your hand at latte art. You can pull off espresso-style brews in an AeroPress or even a French press, in place of an espresso machine. Then, you can make latte milk foam in the microwave, no special tools required.
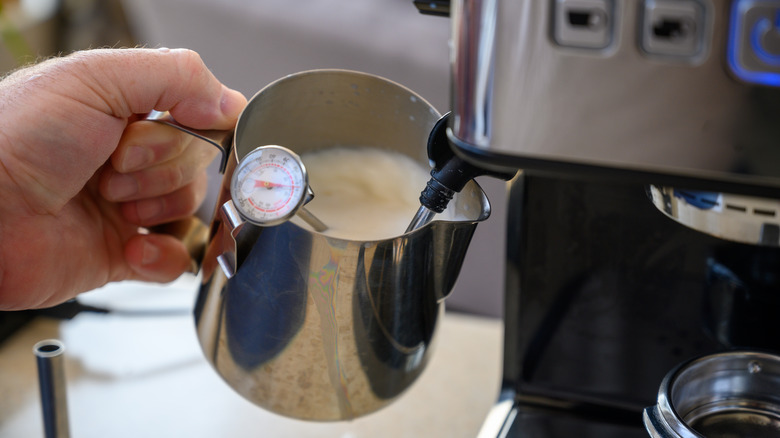
You might also be able to heat the milk on the stove and use a whisk to froth it up. Move the whisk in a back-and-forth motion until those tiny air bubbles form. This can take some elbow grease, and use caution to avoid scalding yourself. Steamed milk brought to a temperature of 150 to 160 degrees Fahrenheit is the best for creating microfoam, so a thermometer can help you out when experimenting with the microwave or stovetop.
Though Jee Choe recommends making lattes with whole cow's milk, it's totally possible to make latte art with plant-based alternatives. Opt for brands of oat or nut milks with a high fat content, since microfoam needs plenty of fat to form properly. Some companies even make "barista-style" nondairy milks that are extra rich and meant for frothing and steaming, creating the vegan microfoam of your dreams.