Mistakes Everyone Makes When Baking Gingerbread Houses
It's beginning to look a lot like gingerbread house season. And what better way to celebrate our favorite time of year than by not totally whiffing it on a made-from-scratch gingerbread house? For the first time. Ever.
Listen, this (drawing a big circle around a random spot in the air) is a safe space. No one among us hasn't dropped the ball on a gingerbread house or two. Perhaps literally. We get it. Gingerbread houses are finicky, the icing is never quite right, and why spend all this time gluing candy to a house when we could just put the Kit Kat straight into our mouths and forget the annoying house part altogether?
Let's make gingerbread houses not stressful. Not sure how long to bake the gingerbread? Do you have house pieces that don't fit? Is there an icing nest in your hair, and yet none of it's sticking to your house? And how does a dinosaur fit into this whole thing? Grab your piping bag and the biggest cup of hot cocoa you can find. We're getting real about how to avoid the most brutal gingerbread house-building mistakes — and what to do if there's no turning back.
Using a weak gingerbread recipe

Set yourself up for gingerbread house-making domination by nailing the structural element: gingerbread. There are a lot of gingerbread recipes out there. So, here's what to look for when you're baking for robustness (and a roof that doesn't implode).
You might think that tougher gingerbread is better here, but that's not necessarily the case. You want a texture that you can work with; not cake and cookie soft, but also not as hard as actual bricks. You're Goldilocks, and you're searching for the perfect squish.
A great recipe is also key since some gingerbread ingredients are styled for cookies, or cakes, instead of architecture. We trust Tasting Table to give it straight on baking basics, and we like the Christmas Gingerbread House recipe for exactly this type of thing. Of course, you can still snack on the trimmings and most definitely chow down on your house. The ratios are just a little bit different here, featuring more flour and eggs than you might usually find, to support the bake's structure.
Ignoring the plan factor

You're building a house, people. You're going to need some kind of strategy so it goes as smoothly as possible. Making a gingerbread house from scratch requires some extra forethought. At least, more than you need for crushing one of those store-bought kits. Stay strong. Just give yourself plenty of time for various elements to bake, cool, and set — and then also a me-time break where you pour yourself another mug of hot chocolate and crank up the Frank Sinatra.
Double-check your gingerbread recipe for extra time suckers like "chill the dough." Many recipes call for cooling it for two hours in the fridge, or even up to several days. This is meant to lessen the molasses' stickiness and to make rolling out the tacky dough that much easier. You'll also need to completely cool the house shapes, post-bake. There will also likely be a timeframe listed in which your house will need to set in its final shape. Walls get iced together first, then, once the roof is in place, the whole thing might require hanging out overnight to maintain its house-iness. Are you familiar with the slip-n-slide roof and walls situation as you try to attach the candy? Perhaps a chimney or frosted winter pine succumbing to Earth's gravitational pull? Yeah. This keeps all of that from happening.
Foregoing the best baking tools

Since we all agreed we're not doing a kit (so... we're not, right?), you must now amass the tools and gadgets required for ultimate gingerbread. Whatever items just popped into your head, we can tell that you already forgot cardboard cereal boxes. It's ok. We're here for you.
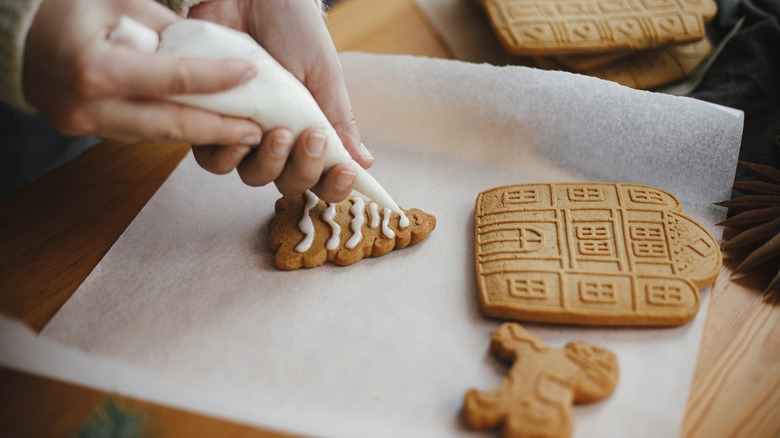
Grab plenty of parchment paper, a sharp knife for cutting gingerbread shapes, a spatula, an electric mixer, and piping bags for the icing. Yikes — we almost forgot the rolling pin — the literal key to evenly thick walls, doors, trees, and an entire civilization of gingerbread people.
But the most important part of your gingerbread mise en place is the blueprint for your house. Grab a ruler to cut the straightest edges, a pencil for sketching, and a couple of cereal boxes (keep the card stock of the box, ditch the Froot Loops) to design your house pieces. The essential structure is this: two peaked wall pieces, two rectangular roof pieces, and two rectangular wall pieces for the sides. Sound too fiddly? A set of gingerbread house pop-out cutters will do the math for you. They're like cookie cutters that also imprint the dough with windows, doors, decorations, bricks, roof tiles — you name it. Thirty-year mortgage not included.
Not trimming it to win it
Now that you have your perfectly baked house pieces (sized down into a mini-scaled likeness of your human-sized house, duh), don't throw all your hard work away by assembling everything as is. Depending on the ingredients, your dough may have spread a little in the oven since you last saw it. No problem. Once you pull your pieces out of the oven, move them off the hot baking sheet, and quickly lay your cardboard template on top of the warm gingerbread. If anything's amiss, gently cut off the extras with a knife. Once the gingerbread cools, you're ready to assemble.
Okay, so you're saying your gingerbread already cooled and you're just now realizing your shapes aren't square? Easy breezy. You can gingerly (gingerbread jokes!) cut straight edges with a serrated knife, or, for smaller jobs, you can refine lumpy shapes and edges by sanding them with a cheese grater. Sorry, did we just invent a new food? Pulverized gingerbread? Either way, we're using it as the "mulch" in our gingerbread house landscaping design.
Committing the royal icing fail

Long live royal icing as the No. 1 "mortar" for gingerbread houses. Like Charles Barkley used to say in '90s ads for Right Guard deodorant, "Anything less would be uncivilized." And as we say in the 2020s, anything less will make your house fall down.
Royal icing is baking's basic boo. But the best part is that it sets hard, unlike, say, a soft, velvety, buttercream cake frosting. It's typically made of confectioner's sugar, water, meringue powder, and cream of tartar, whipped into stiff peaks — and sometimes given a little extra zhuzh with food coloring. Stiffeners like meringue powder, or simple egg whites, add structure to the icing and help it dry securely in place. Need a thicker consistency? Add more meringue powder. Your Big Bad Wolf-proof gingerbread house will be able to stand up to anything.
Still, you might not want to cement your candy onto your gingerbread house with stiff royal icing. Plus, it's very tough to pipe. Here's where a second batch of icing comes in handy. If you want to go nuts with doilies and details, slowly add a little extra water to your already-whipped royal icing recipe, so that it thins out into the consistency of toothpaste. With a little more flow and ease of effort, it's perfect for little gingerbread people's button eyes and smiles. And writing a long, miniature letter to Santa on a tiny scroll in ye olde English calligraphy... we'll stop now.
Forgetting to ice the base

Ever hit turbulence on a flight and watched your fun-sized snack mix glide across your tray table into 14B's no-go zone? Replace the airline peanuts with your stunning gingerbread house, because it will be heading for the floor unless you ice its home base. People, it's sweet, delicious super glue. Don't fight it.
This hot tip goes for literally any serving platter, ever. From a flimsy paper plate to a Waterford Crystal footed cake stand. Ice. That. Ish. And don't look back — even if you're using a wooden cutting board. Your future edible home needs a strong foundation of sticky, icing snow (or, snow-covered in crushed graham crackers if you're doing a beach house). Trust us, it still looks cute, even if that extra icing is mostly functional.
If you're working on a paper base of some kind (cardboard and the like), your house can also leave a dark stain from the fats in the gingerbread. Covering the ground with a generous schmear of icing covers up mistakes or budget materials, and secures your gingerbread house better than a Ring cam.
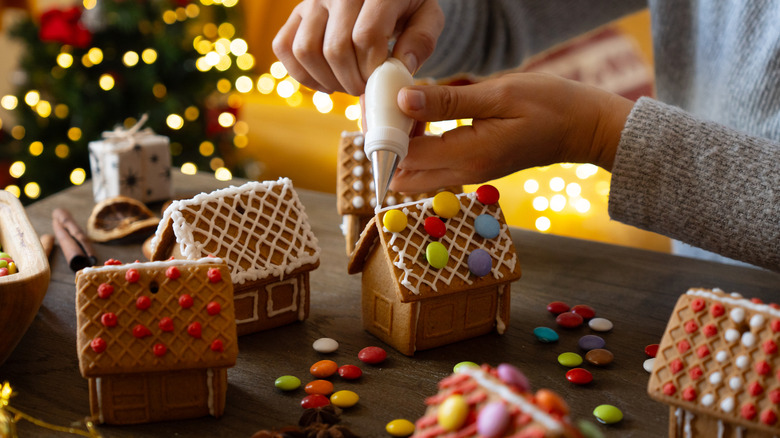
Building the house before decorating
Forget every gingerbread house decorating party you've ever been to. This theory proves that the style over substance method can actually work in your favor! At least in the beginning. Why fight gravity, trying to ice evergreen wreaths, lanterns, and twinkle lights on a vertical wall, when it's so much easier to decorate on a flat surface?
The trick here is to know which pieces of the house this works for, and which ones it doesn't. As TikToker Andie Bryce advises, "The walls you decorate before you build, the roof you decorate after." Just a reminder that you'll need to leave extra time for the icing to dry when you work this way. That roof that's still waiting in the wings? It gets to join the party once the walls are all standing, and the icing on the seams has set.
As you work, just leave a little space between your decorations and the edge of the gingerbread, so nothing gets crushed once you raise the roof. And, speaking of that, now that your walls are camera-ready (and heavier than an undecorated piece of gingerbread), get someone nice to help hold the walls in place as you ice them into submission. After that, add a little decorative icing on the seams, and your gingerbread house will be featured on "House Hunters" in no time.
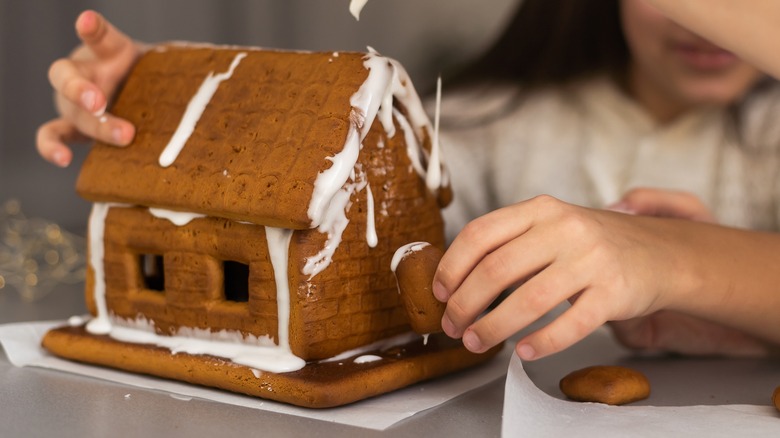
Letting the icing dry before adding candy
We've been preaching the gospel from the pulpit at Our Lady of St. Gingerbread, about letting your icing dry before doing anything else. But just for one second, pretend like you weren't paying attention to any of that. And, whatever you do, don't let the icing set before you get that candy on there.
We too are vulnerable to getting so caught up in the icing part, that we completely space on adding the candy before it's too late — and the icing becomes too hard to be workable with candy. Yes, a naked iced gingerbread house is a look (for a sort of Scandinavian vibe), but, we already bought 20 pounds of peppermints, and, dang it, we're using every last one of them.
This scenario sounds disastrous, but already-dry icing is easy to avoid. Just work in small portions, applying icing and candy as you go. Say you do an entire window (cutie Tic Tac windowsill and all), and then move on to the door. Or, you work in rows to shingle the roof. And no worries if you've got too much icing happening at once. Just remove the icing with a sharp edge or knife, and get right back to decorating.
Running out of candy

Unlike the latest trick-or-treating craze, our collective gingerbread house decor trends feature candy that's been around the block once or twice. Or, in the case of Necco Wafers, since 1901 (they've appeared as shingles and pathways ever since). Topping the list are classics like gumdrops, M&Ms, candy canes, and Hershey's Kisses. But you can go rogue with jewel-like jelly beans, a smattering of Nerds, or Tootsie Rolls and pretzel sticks for Lincoln Logs energy. There are, unfortunately, those of us who use shredded wheat for thatched roofing, plain Chex cereal for cobblestone pathways, and broccoli florets for evergreen foliage. We don't associate with those people.
Another genius tip is to put out a separate candy supply that's specifically for snacking (is this just for gingerbread house time, or, like, every day?). This makes it easy to guarantee you'll have enough candy hearts and Hershey's Kisses for your Valentine's Day-themed gingerbread house, and everyone's sweet tooth goes home happy, too.
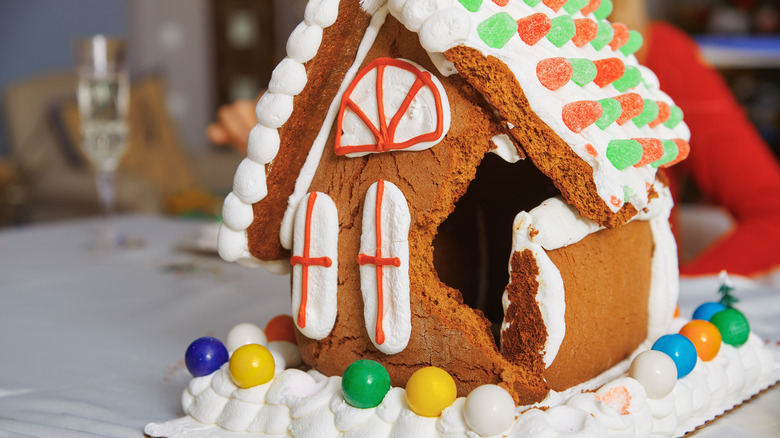
Having zero Jolly Rancher windows

This one's for the warriors who bravely cut windows into their gingerbread house pieces — instead of just icing them and leaving the interior occupants trapped in a gingerbread escape room. But you're not gonna leave a hole in the wall, are you? No. You're gonna class it up with a window pane.
Leave all the other houses in the dust by adding some serious Jolly Rancher curb appeal. You can use whatever hard candy you have, just as long as it's the transparent type. Once your gingerbread wall pieces are fully cooled after their bake, lay them flat on top of parchment paper, place a whole Jolly Rancher (or the crushed pieces of one) in each window, and throw it back in the oven for a few minutes to melt your new windows into place. You can coax any reluctant candy to the edges of the window with a toothpick. Let that cool, and boom — let there be light.
Of course, most Jolly Ranchers are going to create somewhat of a stained glass window vibe, thanks to their vibrant colors (we see you, green apple, blue raspberry, and watermelon). But if you're going for a realistic glass look, definitely hunt down the white-ish, clear pineapple candies. They are as close to the real deal as humanly possible in the gingerbread world. Add a frosty look with a dusting of powdered sugar, and the blue ribbon goes to you.
Focusing only on the exterior design
Now that we can fully see inside your gingerbread house (yikes, people, ever heard of curtains?), don't drop the ball on the interior design of your candy wonderland. It's a super fun, easy detail that adds whimsy — and maybe makes gingerbread roof thieves a little less likely to rummage through your real estate.
The best part is that you create the magic. And you don't even have to hang any wallpaper. If your house has windows, popping a strand of tiny battery-powered fairy lights under the roof brings your little house to life. Add a few gingerbread characters or a cookie Christmas tree, and you've got yourself the world's sweetest party.
Of course, there's probably no beating the masterpiece interior created by London's Biscuiteers Baking Company geniuses. One of its extraordinarily detailed gingerbread houses featured a Victorian master bedroom with a rug, a painting, and a luxurious canopy bed, a game room with a pool table, a dining room table and chairs for 10, plus candelabras, and art sculptures — all replicating Waddesdon Manor in Buckinghamshire, England (is it cool if we grab a frosted cookie dining chair for the road?).
Not going full Nor'easter

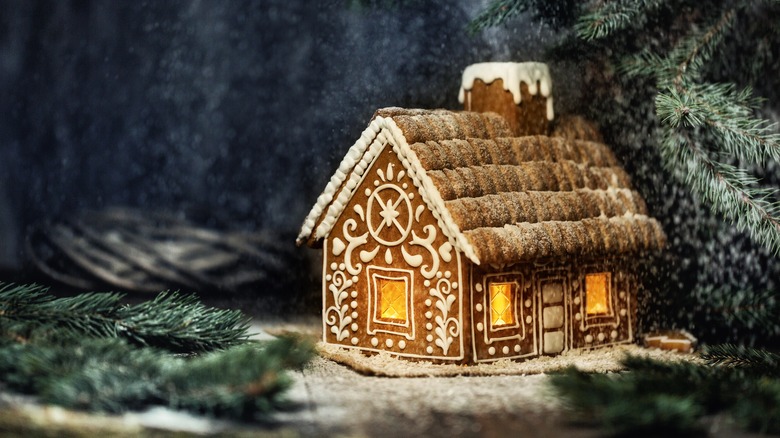
If you've never blasted a gingerbread house with an ice age's worth of snow and icicles, you're definitely missing out. Extra snow is by far the number one way to hide any structural issues or design flaws your little biscuit hovel might have.
Grab your piping bag, a flat spatula, and any remaining icing. You can also work with powdered sugar and even coconut flakes. Anything goes. Want the shimmering, glittery sheen of real snow? White sparkling sugar looks just like the real thing. And tastes a lot better. Oh, c'mon, the '80s "Christmas Story" kids. We all know what snow tastes like.
Fat icicles do the work of hiding mismatched roof seams, and drafty cracks in the walls or windows. Thick snow drifts make a festive and functional design element for bloopers around the base of your house. Of course, if you went for a winter-scape theme, a dusting of powdered sugar over the whole thing adds that extra touch, no matter how flawless the house is.
Forgetting the dinosaur
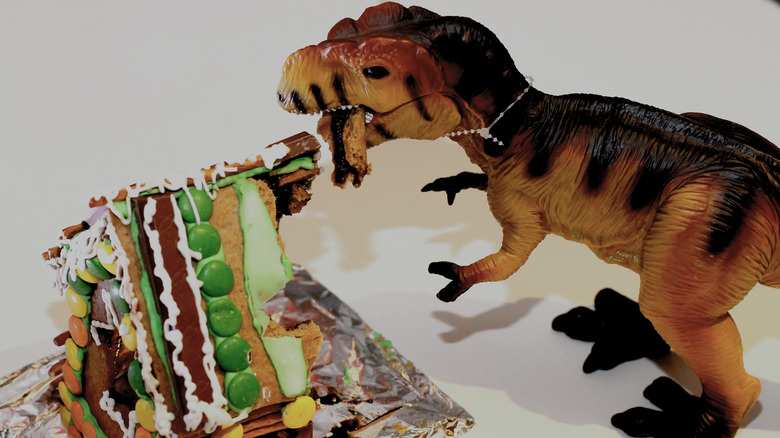
OK, this is a worst-case scenario fix. Your gingerbread house is a total failure. It fell on the floor, your kid face-planted into it while adding that last marshmallow or the dog chomped half of it off the counter, even though you specifically left it in the least accessible spot. Don't even think about throwing that thing in the trash. Let's dinosaur.
Twitter and TikTok prove that even the most "holy crap, everything's ruined" gingerbread disaster can become a striking diorama, should the moment present itself. It's as if the former home was transformed into a poetic apocalypse showcasing the destruction that would certainly befall us if these prehistoric beasts roamed the earth today. And also had a massive sweet tooth.
Grab your kid's toy dinos and throw them into the scene. Shove chunks of gingerbread into their plastic mouths and get their T-Rex hands a little dirty with some icing or candy. We promise you, it's a total pro move. And if we didn't already spend all day building our gingerbread house, we'd crush the crap out of it just to add a Bronto (and freshly-fallen snow with dino-sized footprints in it).
Ignoring the occasion

So you've finally completed your dream house. Well done. Whoa, whoa, whoa, don't just plunk it on the kitchen table with the junk mail and whoever's hat knitting project that is. Here's where you can go from gingerbread house to gingerbread home sweet home, by displaying your work like it was always destined to be.
Number one, no refrigerating. Instead of preserving your masterpiece, the fridge air actually softens the gingerbread to the point where it crushes in on itself, and the candy dissolves into a rainbow-stained mess. Your best bet is to display your gingerbread house at room temp. But, of course, you've gotta do it in style.
If your decorated house is on the smaller side, a domed cake stand is a perfect solution to keep your work protected from dust, pets, and maybe candy capers — while also enjoyed throughout the season. If you've got a taller design, snag a sheet pan and decorate it enough to make your house feel comfy and cozy. An upside-down fish bowl can also do the trick of making your gingerbread house look like a snow globe. You can also use the lid of a jar, topped with the jar itself if your house is small enough. As they say on "The Great British Baking Show," "Ready, get set, bake!"