Temarizushi Tonight: How To Make Handball Sushi
We may receive a commission on purchases made from links.
If you're going to cook Japanese at home, you're going to need some pointers! Join culinary instructor and cookbook author Kimiko Barber and build up a respectable repertoire of fantastic, classic Japanese dishes. This handball sushi will turn even the greenest novice into a sushi-making machine. You'll need Masaharu Morimoto's tamagoyaki recipe to make the egg sushi.
Nigiri-zushi, hand-squeezed sushi is the most difficult to master — it is not just a case of making small rice nuggets and putting slices of raw fish on top. It is an art that takes years of apprenticeship, and out of respect, in Japan people tend not make this type of sushi at home, but go to sushi bars. But do not be disappointed, because there is a quick and easy version of nigiri-zushi called temari-zushi, literally handball-sushi. It is the nearest thing to nigiri-zushi without undergoing years of training, and all you need is a plain cotton handkerchief or plastic wrap.
Temarizushi Tonight: How To Make Handball Sushi
Ingredients
- Heaping 2 1/8 cups short-grain sushi rice
- 1 postcard-size piece dried kelp
- 1/3 cup sushi vinegar
- 6 1/2 to 6 2/3 cups prepared sushi rice
- 1 ounce smoked salmon
- 10 cooked shelled shrimp
- 2 to 3 thin omelets
- A tube wasabi paste
- 2 tablespoons salmon roe
- 1 to 2 tablespoons peppercress
- Sushi pickled ginger and soy sauce
- A bowl mild vinegar water
Directions
- :::sushi rice:::
- Wash the rice under cold running water, drain, and set aside for 30 to 60 minutes to let it absorb moisture.
- Put the washed rice and a scant 1 cup water in a heavy-bottomed saucepan with a tight-fitting lid. Make some slashes in the kelp to release more flavor, and place it on top of the rice, then wait for 10 to 15 minutes before turning on the heat. Cover, bring to a boil over high heat, and when it just begins to boil, remove and discard the kelp. Reduce the heat to medium and continue cooking for 6 to 7 minutes, then reduce the heat to low and simmer for 12 to 15 minutes, or until steam stops escaping. Turn off the heat, and let steam, with a dishtowel wrapped around the lid to stop condensation dripping down on the rice, for 10 to 15 minutes.
- Moisten a hangiri or shallow wooden or plastic tub to stop the rice from sticking. Spread the hot rice in a thin layer in the tub. Sprinkle sushi vinegar over the rice, then, with a moistened rice paddle or a flat spatula, toss the rice using cut-and-turn strokes (the lateral motion separates and coats the grains without bruising or mashing) and at the same time, cool it quickly by fanning. This is a bit tricky to do by yourself, so either get someone else to fan the rice or, if you are on your own, alternate tossing and fanning, rather than juggling both.
- Sushi rice is ready when it has cooled to room temperature, and the grains are fluffy and glisteningly shiny. Try not to overdo this, as the rice will become sticky and heavy. To keep sushi rice from drying out, cover it with a clean damp cloth until needed, but use it up on the day it is prepared.
- :::sushi balls:::
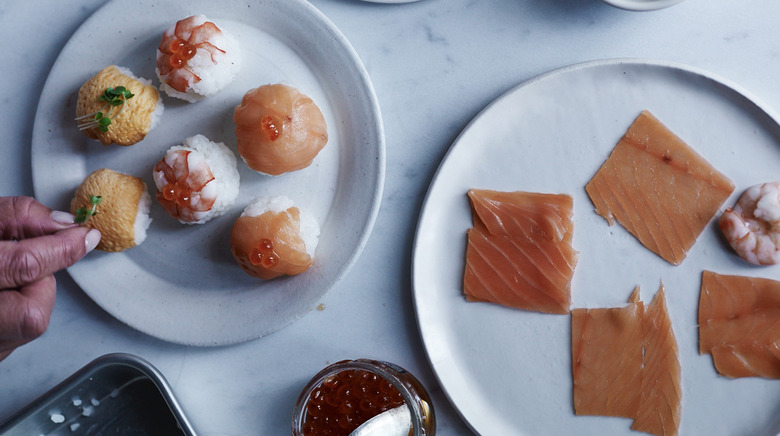
- Divide the sushi rice into 3 equal portions — about 2 1/8 cups each for the smoked salmon balls, for the shrimp balls and for the omelet balls.
- Moisten a clean cotton handkerchief or a six inch square of plastic wrap with the vinegar water, and hold it open on your left hand. Place a piece of smoked salmon in the middle. Wet a tablespoon in the vinegar water and take out a generous spoonful of the rice (about 1/8 cup), then put on top of the salmon. Bring the corners of the handkerchief toward the middle over the rice, gather and twist to shape and compact the rice into a small ball.
- Unwrap the ball and place it on a cutting board, and cover with another clean damp cloth while you make nine more salmon balls. Next, repeat to make ten shrimp balls and ten omelet balls.
- Squeeze a pinhead of wasabi paste in the center of the salmon squares and shrimp crescents, and put a few salmon roe on top. For the omelet balls, garnish with a pinch of peppercress.
- To serve, arrange the balls either on a large platter or on four individual serving plates with a mound of sushi pickled ginger and soy dipping sauce on the side.
- If you are making this in advance (up to 3 hours), keep the balls covered with a clean damp cloth, or plastic wrap until ready to serve.