The Foolproof Way To Make Pulled Pork Shoulder
Food Republic's column Ask Your Butcher seeks to answer FAQs in the world of butchery. Ethically minded butcher Bryan Mayer has opened butcher shops and restaurants and has trained butchers in the U.S. and abroad. He helped develop the renowned butcher-training program at Fleishers, where he is currently director of butchery education. In each column, Mayer tackles a pressing issue facing both meat buyers and home cooks. Next up: how to make pulled pork.
Is there anything better in the culinary world than slow-cooked, braised or smoked pork? There's the tender meat, the sweet fat and the sticky, crunchy skin. You can take your pork chops, sirloin steaks and tenderloins, but I'll set my oven or smoker temps to low and wait for those glorious results. I often wonder why more people don't cook this way — it's almost foolproof and requires little more than just salt and time. Got a lazy winter weekend afternoon? Toss it in the oven. Don't feel like heating up the house when it's 90°F? That's what the grill or smoker is for. Can't sit home and enjoy the aromatic pleasure of slow-cooked pork filling your home? Crock-Pot time.
Let's not forget the endless permutations of pulled pork. One pork butt — or, my favorite, the picnic (the lower part of the shoulder) — can be used for pasta sauces, pizza, casseroles, enchiladas, pork buns, tacos, ramen, et cetera. It's the greatest utility player in the meat case. It's got all the fat you need to render and keep things juicy, all the skin to keep it crispy, and with woodlot or pastured pork, you've got the sweetness of an animal raised on a diet that it has been biologically designed to eat.

My go-to dish whenever I'm hosting a bunch of people is pernil. A traditional Puerto Rican holiday roast that has its origins in Spain and Portugal, it's cooked with all its skin and bones! While some debate that it should come from the ham, I was taught to use the shoulder. All that connective tissue in the shoulder is primed to be broken down into delicious gelatin. The picnic portion of the shoulder is perfect for this preparation due to the nature of the muscles contained in this section. These slow-twitch muscles do a lot of work, holding the animal up and supporting its weight.
Both time and temperature have effects on the muscle. The lower the temp (between 250 and 300°F) that you can cook it, the longer it will take to come to the magic temp of 190-200°F — that's the temp you'll want for perfectly shreddable pork. Anything below, say, 175°F, will be fine and you'll be able to slice it, but that's not what we're going for here.
What about that crispy skin, you ask? Sure, it may only account for a fraction of the total weight of your picnic, but a quick blast of heat is all it needs to be rendered (pun intended) into crispy perfection. Cooking your shoulder at a low temp allows the slow breakdown of all that connective tissue, even in the skin. But it still retains some water. And while that juiciness is perfect for the muscle, a quick blast at 500°F will do the job on that skin. You can do that as soon as your shoulder reaches the desired internal temp, but what's even better is letting it cool for a bit, allowing your oven to come up to temp (500°F). After that, toss it back into the oven, allowing that last bit of moisture to evaporate and that skin to expand. Guaranteed crispy skin!

We can't talk about pernil without talking about a bit of prep. It's fairly easy — you can season and cook it right away, but if you give it a day to cure, the flavor will be incredible. It's a simple mix of salt, pepper, garlic, oregano, olive oil and vinegar, mixed into an almost paste-like consistency and rubbed over the shoulder.
First, however, we'll need to perform a bit of butchery and peel back the skin to expose the fat underneath. The picnic portion of the shoulder is shaped a bit oddly, which makes peeling back the skin a bit more challenging than the butt portion of the shoulder. Pick a corner and slide your knife just underneath the skin, leaving as much fat as you can on the muscles. Work in long strokes from the hilt (the part of the blade closest to the handle) to the tip of the blade, moving across the picnic from one end to the opposite. You're attempting to almost remove the skin in one sheet and create a sort of skin flap. This will get a bit tricky when you get to the section where the arm bone has been removed. No worries — do the best you can. In the end, it's all going to be crispy, delicious pork skin!
Once you've got the skin peeled (not removed), take your knife and begin to poke holes all over the picnic, piercing down through the fat deep into the shoulder. This will allow for two things: It'll capture some of the rendered fat while the shoulder cooks slowly, and it'll serve as little flavor pockets as we rub in our spice mix. And that's exactly what we're going to do next. Mix up your spices and give the shoulder a good rubdown. Make sure you coat both the muscles as well as the underside and outside of the skin. Fold the skin back onto the muscles and give the outside a good coating of kosher salt. This will help dry out the skin a bit more as it cures in your fridge overnight.
You're going to need some time for this — about eight hours to get to that 190°F. So give yourself plenty of time. If you're cooking it in the oven, might I recommend an overnight? The best part of waking up is definitely not Folgers in this case! You're almost ready at this point — just one more step. Since you've cooked the shoulder at such a low temperature, you haven't given the skin much of a chance to really crisp yet. You've broken down most of the connective tissue, but to really get that crisp skin, we'll need to blast it with a dose of high heat. Some will argue that radiation (the type of heat you get when you are using your grill) is better than convection (what you get when you use your oven) for getting crisp skin, but I've gotten great results using an oven. Remove the shoulder from the oven, turn the temp up to 500°F and then return the shoulder to the oven and allow to cook for roughly 10-15 minutes. That's it.

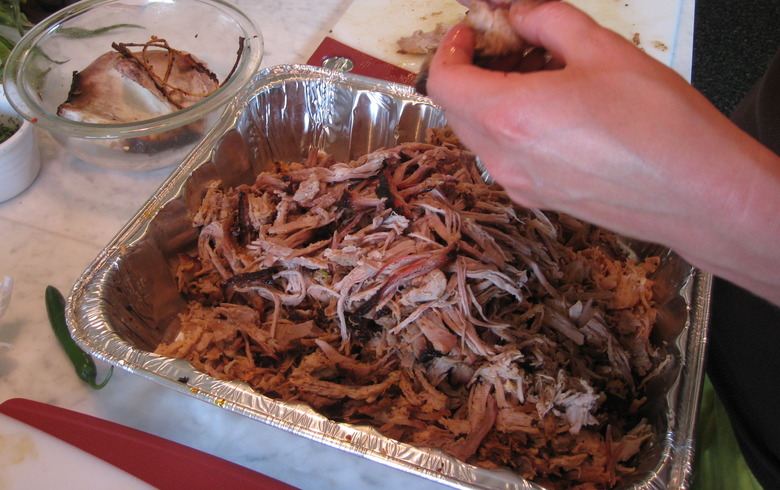
Allow it to rest for 20 minutes and start pulling. By that, I mean shredding the meat with your hands or a fork. If it's still a bit too hot, keep a bowl of ice water handy to dip your fingers in; alternatively you can use two forks and shred the meat between their tines. I like to separate the skin from some of the bigger pieces of fat and meat, and then combine together for a perfect mix, reserving some of the crispy skin for my own personal snaking.
Pernil
Ingredients
1 (7-9 pound) pork picnic shoulder from a fully pastured/woodlot pig
8 cloves garlic, peeled and minced (you can use 1 teaspoon powder if you'd like)
½ teaspoon black pepper
½ teaspoon oregano
1½ teaspoons salt
1 tablespoon olive oil
1 tablespoon apple cider vinegar
Directions: