How To Make Homemade Beef Jerky
Food Republic's column Ask Your Butcher seeks to answer FAQs in the world of butchery. Ethically minded butcher Bryan Mayer has opened butcher shops and restaurants and has trained butchers in the U.S. and abroad. He helped develop the renowned butcher-training program at Fleisher's. Today, he consults with farmers, butchers, chefs and anyone else who will listen. In each column, Mayer tackles a pressing issue facing both meat buyers and home cooks. This week, he takes a look at making a surprisingly nutritious, surprisingly simple, snack at home — beef jerky.
Right about now, my post-holiday blues set in. It's cold, it still gets dark way too early (thanks daylight savings), and walking and biking — my two main forms of transportation — are not fun. So maybe it's the perfect time for me, and perhaps for you, to learn how to do something new. Bake some bread, start a charcuterie project or perhaps make some beef jerky!
Beef jerky is a nutrient-dense snack. It's a lightweight, portable source of protein, perfect for winter hikes. It's shelf-stable, which means that it can be stored without refrigeration, since most of the moisture has been removed. That makes sense for something that's been around for thousands of years. As for any of you with fears of food-borne illnesses, rest assured, we will employ a step at the end to assuage your fears. Also, according to NPR, the beef-jerky market has never been bigger.
More than a few butcher shops make their own jerky, and aside from differing techniques and spicing, they all have one thing in common — they're pricey! Not that it shouldn't be, as there's a lot that goes into making jerky — the seasoning, the drying, maybe a bit of cooking, and, of course, time. It's the reason why the artisanal jerky market has exploded over the past decade or so. People love jerky, and they really love jerky from well-raised animals made from minimal ingredients. If you look at your more traditional jerky producer's ingredient list, there are more than a handful of five-syllable words and initialisms. And while I'm not a chemical-phobe, I do like my food products produced with as minimal inputs as possible. And certainly without the use of corn syrup, something that's fairly prevalent. In my opinion, when you make beef jerky from fully pastured, grass-fed beef, it tastes better with just a few simple ingredients.
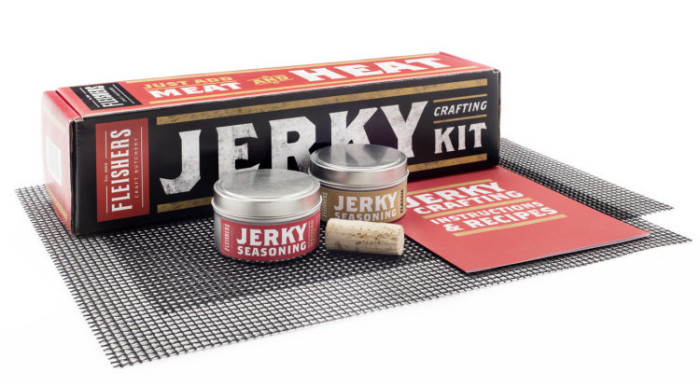
For the semi-do-it-yourselfer, there are several products out there to ease you into the process of making your own jerky, from cutting devices that help you get a perfect 1/8- or ¼-inch slice (what I recommend to get that great jerky chew without it being too brittle) to jerky guns, if you decide to use ground meat, to kits that provide everything but the meat. My friends at Fleisher's Craft Butchery happen to make one of the best kits available. Designed by Chris Woehrle, Fleisher's director of packaged goods, the kit provides drying racks, spices, detailed instructions and even a cork to keep the oven door propped open (more on that later). Chris is no newcomer to the world of dehydrated protein. He started Kings County Jerky based on the need for a product that was akin to how it used to be made. In Chris's words, he wanted to treat jerky like charcuterie instead of like a mass-produced junk food.
But if you're all in for the DIY experience, there's not much more you'll need than meat, spices and an oven. Let's make some jerky!
The Meat
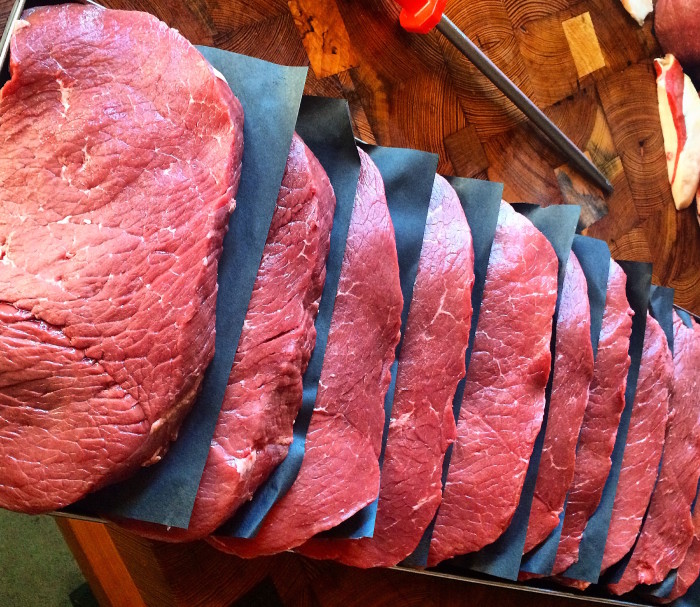
We're talking about beef jerky, but you can certainly sub in whatever protein you'd like. Drying and cooking times will vary, especially if you're working with poultry or veggies like portabella mushrooms. Fish can be used to make great jerky as well; just stay away from oily ones like bluefish. For our purposes, we're looking for a lean, sinew-free cut of beef. Muscles off the round work great — specifically top, eye and bottom rounds. I've seen recipes that call for flank steak, but if you're shopping at your local, whole-animal butcher shop, those cuts tend to go fast, and they'll be a bit pricier. The long muscle fibers in the round cuts are suited perfectly for this job. You can cut with the grain or against; it all depends on what kind of texture and chew you're going for. With the grain you'll get that classic jerky pull. Against the grain, you'll get an easier, more tender chew. There's no wrong way.
We like lean cuts for making jerky. Highly marbled and fattier cuts can result in rancidity and off flavors during drying and storage. So make sure your cut has all the external fat removed. Keep in mind that whatever cut you chose, there will be considerable weight loss due to the dehydration. Sixteen ounces of raw meat will make approximately four to eight ounces of jerky. This, of course, all depends on the thickness. We're looking for somewhere between 1/8- and ¼-inch cuts. You can ask your butcher to do this for you, or you can pop whatever cut you've purchased into your freezer for a couple of hours. You don't want it frozen solid — just enough to make it sturdy for slicing thin. If you're the obsessive type, you can even flatten them, once they are sliced, with a rolling pin to ensure a uniform thickness. My obsessions lie elsewhere.
The Marinade
While the cuts are fairly specific, the marinade is where you get to express yourself. Soy sauce (or tamari for a gluten-free option), Worcestershire sauce, garlic, cayenne, red pepper flakes, brown sugar, whatever you'd like — experiment! However, for your first time, I suggest something simple, like salt, pepper, vinegar and water. This will allow the natural taste of the beef to come through and allow you to focus more on the drying times and texture you want to achieve. A quick mix of all your ingredients and then into a zip-top bag for an overnight stay in your fridge. Twenty-four hours works great, but if you absolutely must, you can get away with three.
The Machinery
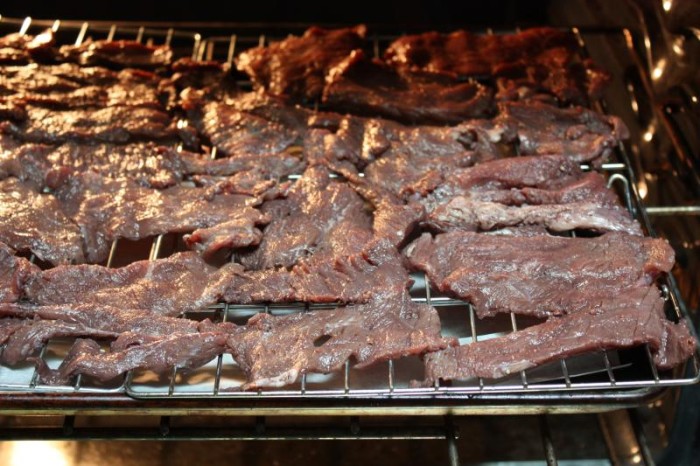
There's no need to go out and purchase fancy equipment for this — you've got everything you need at home. But if you're the type who likes to dive headfirst into a project, go ahead and gear up. Both Excalibur and Cabela's make fine consumer dehydrators that are fairly inexpensive and easy to use. Their temps usually max out at 160°F, so you'll have much more flexibility in your drying times. An oven will work great as well with a little MacGyver-ing. I'm assuming most of you don't own a convection oven. A great workaround is to keep the oven door propped open to allow some airflow. [Editor's note: If you are using a gas stove, make sure the pilot light is on.] If you're like me, you've got more than enough of the perfect tool sitting around — wine corks. Just prop one between the oven door and the enclosure to ensure some air circulation. If you happen to purchase the Fleisher's kit, Chris is kind enough to include one. Don't let that stop you from popping open another bottle, though.
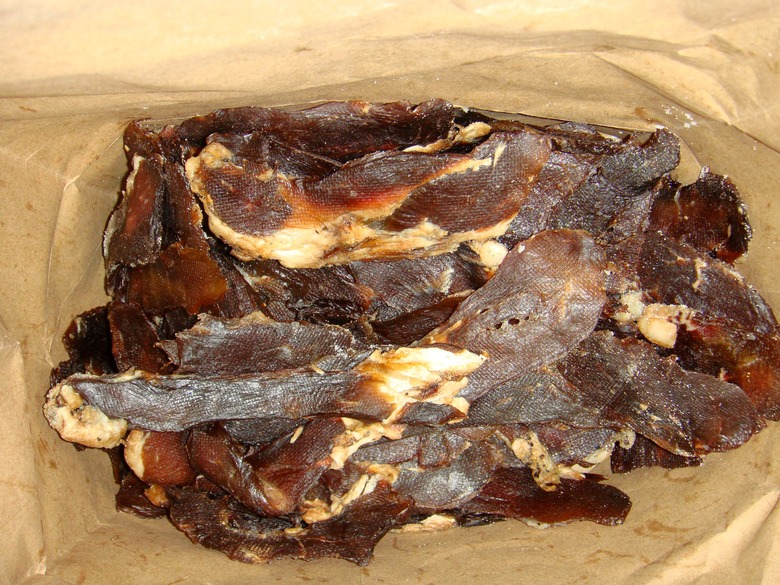
Most ovens I've seen don't go below 170°F. If you have to go higher, make sure you are checking regularly. You won't need much more than four hours of drying time at those temps. Remember: We want something chewy, almost "leathery." We want something akin to a green stick that bends, not a dry, brown one that snaps. Hot tip: Make sure to coat your oven racks with a bit of oil to prevent the meat from sticking, and place a large sheet pan on the bottom of your stove or cover with foil to catch anything that may drip. To ensure any potential pathogens are eradicated, we'll finish with a quick 10-minute blast at 275°F.
Some pieces may be moister than others when you remove them from the oven. We'll employ a conditioning step that will help to distribute the moisture evenly. Pack the cooled pieces into a glass or plastic container, making sure to leave a bit of room. Cover and give them a shake every day for about three to four days. This results in any excess moisture being absorbed by drier pieces. If you notice any moisture forming on the lid of the container, place back into the oven to dehydrate further, repeating the conditioning step. Make sure to keep a log of total dehydrating time so that you don't need to repeat steps your next time around. Of course, none of this is necessary if you plan on eating it right away.
For storage, you'll want to find a container that has a tight-fitting lid and is protective against light. But more importantly, you'll need a cool, dry, dark spot to store it. Under these conditions, it should last up to two weeks. Toss them in the fridge and you should get three to six months out of it. I don't know why you would want to freeze them. There's always the chance some mold may form. I shouldn't have to tell you what to do if you see mold, but just in case, toss it!
Simple Salt & Pepper Jerky
Ingredients
2 pounds lean beef from fully pastured, grass-fed cattle (top round, eye round, bottom round)
3 teaspoons salt
1½ tablespoons pepper
¼ cup vinegar (optional, but helps with tenderization)
Directions: