Perfect Pastry: Make Turkish Coiled Tahini Buns
We may receive a commission on purchases made from links.
We never met a recipe by food and travel writer Robyn Eckhardt that we haven't totally loved, so her new cookbook is a much-anticipated treat. Dive head-first into this in-depth study of Turkish cuisine, and find a new favorite way to prepare all kinds of versatile ingredients. These coiled tahini buns are well-worth the labor of love.
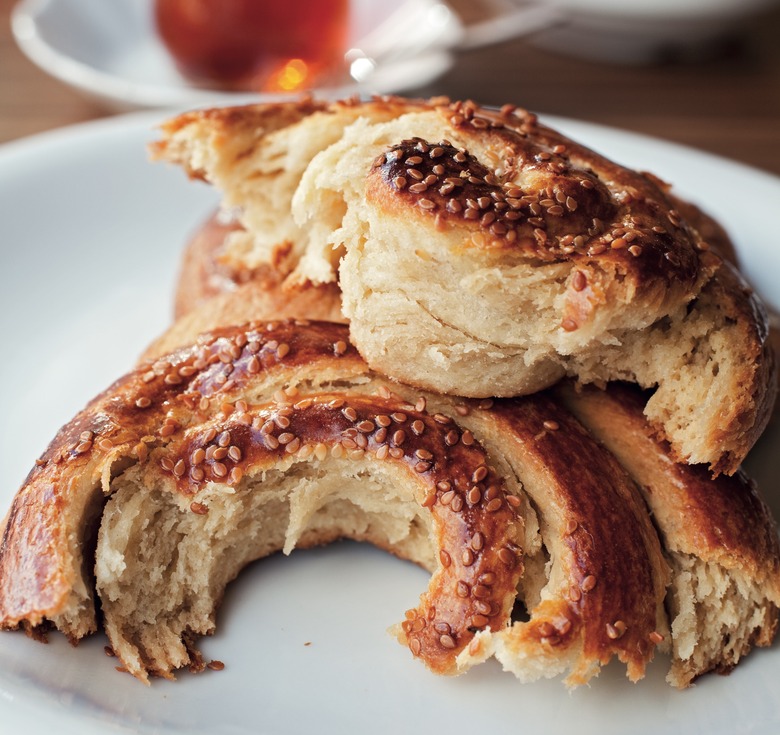
In these lightly sweet bread coils, which are eaten for breakfast or as a snack, with tea, layers of tender buttery dough conceal pockets of rich, nutty sesame paste. My touchstone for this treat has long been the version from Yedi Sekiz Hasan Pasa, a bakery in Besiktas district, on Istanbul's European side, that dates back to the latter years of the Ottoman Empire. There the pastries are bigger than the palm of my hand and heavy with sesame paste. Veysel Büyüksolak, a young pastry chef at Istanbul's Nicole restaurant, offered helpful advice when I attempted to replicate the buns at home.
To create the flaky layers, a circle of dough drizzled with tahini is rolled into a rope, which is in turn twisted before being coiled. In Turkey, pastry chefs and home cooks use an oklava, a long, thin rolling pin, to roll and stretch their dough. You can buy an oklava, which is also useful for making plain pastry dough, online, or use a 20-inch piece of wooden dowel or light metal piping instead. For those with little patience for rolling dough, I've also included directions for making buns that are smaller, plumper, and less flaky but no less delicious. The dough ropes may leak a bit of tahini when they are stretched, twisted, and coiled. Just wipe the sesame paste from your work space with your finger and smear it over the dough; the oil will leave a desirable sheen on the pastry.
These buns keep for up to 5 days and freeze well. They're best warm: Wrap in foil and reheat in a 350°F oven.
*To mix bread dough in a stand mixer: Mix the dry ingredients (plus spices, if included) in the bowl of a stand mixer. Mix the yeast with the water (plus any other liquids, yogurt, and/or eggs, if included) in a separate bowl. Pour the liquids over the dry ingredients.
Attach a dough hook to the machine. Mix on low speed until the dough begins to come together, then increase the speed to medium. Knead the dough until it reaches the consistency described in the recipe (smooth and elastic, or smooth and slightly tacky), 5 to 10 minutes, depending on the recipe. Stop the the machine as needed to scrape the dough from the hook. (If, after 5 minutes of kneading, the dough is still sticking to the bowl, add flour, 1 scant tablespoon at a time, kneading for 30 seconds after each addition, to bring the dough to the proper consistency.) Turn the dough onto a work surface, form it into a ball, and transfer to a lightly oiled bowl.
Perfect Pastry: Make Turkish Coiled Tahini Buns
Ingredients
- 3/4 cup water
- 1 tablespoon instant yeast
- 4 3/4 cups bread flour
- 1 cup sugar
- 1 1/2 teaspoons fine sea salt
- 2 large eggs
- 3/4 cup vegetable oil
- 2 1/2 cups tahini
- 1/4 cup plus 2 tablespoons sugar
- 1 egg
- 1 teaspoon water
- Pinch of fine sea salt
- 1 tablespoon plus 1 teaspoon untoasted white sesame seeds
- 2 teaspoons sugar
Directions
- :::dough:::
- To mix in a stand mixer, see note*. Put the water in a large bowl and sprinkle the yeast over it. Whisk together the flour, sugar, and salt in another bowl.
- Beat the eggs and oil together in a small bowl, add to the yeast mixture, and stir lightly to combine. Add the dry ingredients and use your hands or a dough scraper to mix and cut the ingredients together. When the mass comes together, it will be sticky and oily; turn it out onto an unfloured surface and knead, adding up to 2 tablespoons of flour, 2 teaspoons at a time, as necessary, until the dough is smooth and only slightly tacky, about 8 minutes. Transfer the dough to an unoiled bowl, cover with plastic wrap, and let rise until it has increased in size by half, 30 to 45 minutes.
- Turn the dough out onto an unfloured work surface and divide it into 8 roughly equal pieces. Roll each piece into a ball, cover with plastic wrap or an upturned bowl, and let rest for 15 minutes.
- Place the racks in the upper and lower thirds of the oven and heat the oven to 400°F.
- :::pastries:::
- Lightly flour a large work surface. Place a dough ball on the surface and roll it out to an approximately 10-inch circle. If you started with a regular rolling pin, switch to an oklava or other long pin (see headnote). Lightly flour the bottom third of the dough and the pin. Place the pin at the top edge of the dough and roll the dough up around the pin as you move it toward you. Stop after every second or third rotation of the pin, lightly place your palms side by side at the center of the pin, and roll it back and forth beneath your palms as you move your hands away from each other along its length. Use a light touch and roll in short strokes. You should feel and see the dough stretching. Continue rolling the dough up onto the pin and stopping to stretch it until it is completely wrapped around the pin. Lift up the pin, flour the work surface again, and carefully unroll the dough onto the surface, turned 90 degrees from its original orientation. Don’t be discouraged if the dough is not a perfect circle, or if it is not much larger than when you started; this just means that you need to apply more pressure to the pin as you roll it out again. If the dough sticks to itself, flour it a bit more heavily before rolling it onto the pin again. Repeat this technique—wrapping the dough around the pin and turning it 90 degrees each time—as many times as necessary to achieve a very thin circle at least 16 and up to 20 inches in diameter. If, when you’ve finished rolling the dough, it’s thicker in some spots than in others, use the rolling pin to even it out. Work your way around the dough circle, lifting the edges to the center to make sure it doesn’t stick, gently stretching the dough as you do so. Be sure not to tear it. Alternatively, use a regular rolling pin to roll the dough out to a 12- to 14-inch circle.
- Distribute ¼ cup plus 1 tablespoon of the tahini over the dough circle. The easiest way to do this is to scoop up a tablespoonful at a time, hold the spoon a foot or so above the dough, and move your hand as you tilt the spoon. Don’t skip the edges of the dough—if you end up with some tahini on your work surface, just use your finger to dab it up and smear it on the dough—and don’t worry about unevenly distributed tahini. Sprinkle 1¾ teaspoons of the sugar over the tahini.
- Roll the dough up into a rope. The rope needn’t be perfect, and it shouldn’t be too tight, but try to keep it as thin as possible. If once you’ve rolled the dough into a rope, you find that tahini has leaked out, just wipe it up with your fingers and gently spread it over the outside of the rope.
- Lay the rope on your work surface parallel to your body. Starting in the center of the rope, with your hands about 8 inches apart, pick up the rope and move it gently up and down while gently tugging on it; it will begin to stretch. Repeat this motion several times, working on different sections of the rope, until it is 3 to 3½ feet long. Alternatively, if in Step 5 you opted to work with a smaller circle of dough, your rope should be about 1½ feet long after stretching. (To complete this step on a smaller work surface, loop the rope back on itself several times and work on a small section at a time.) As you work, try to keep the rope equally thick along its length.
- Now twist the rope: Place the palm or fingers of your left hand on the rope about 1 foot in from its right end and, holding that bit of the rope in place, twist it with your right hand. Don’t twist so tightly that the rope curls in on itself, but the twist marks should be visible. Repeat, working your way down the rope, until it is twisted along its entire length.
- Line two baking sheets with parchment paper. Form the rope into a loose coil on one of the sheets, leaving an ⅛-inch gap between each ring of the spiral coil. Tuck the end of the rope underneath the outer edge of the coil. With your palm or the heel of your hand, gently press down on the coil to join, but not fuse, its rings. Lay a damp towel over the pastry while you use the rest of the dough to make 7 more coils, distributing them between the two baking sheets and covering with a damp towel as you finish them.
- :::wash:::
- Beat the egg with the water and salt in a small bowl and brush the surface of the buns with it. Sprinkle ¼ teaspoon of the sugar and ½ teaspoon of the sesame seeds over each one. Bake until the buns are walnut colored, 16 to 20 minutes, switching the baking sheets from top to bottom and front to back at the halfway point.
- Transfer the baked buns to a wire rack and let cool for at least 20 minutes before serving. Once cooled completely, the buns can be wrapped well in plastic wrap and stored for up to 5 days or frozen. for up to 1 month.