Braise It Now: Pappardelle With Year-Round Sugo
We may receive a commission on purchases made from links.
You braisin'? You should be. The cold weather is in full swing, and NYC chef Justin Smillie's new cookbook, Slow Fires, is not unlike a long poem (with recipes) about that special, magical moment when a tough, meaty, collagen-bound piece of meat gives up its treasured secret and yields willingly to nothing more than the tines of a fork. We're talking about slow cooking, folks — oxtails most definitely included. You'll need a Dutch oven and a thing for delayed gratification.
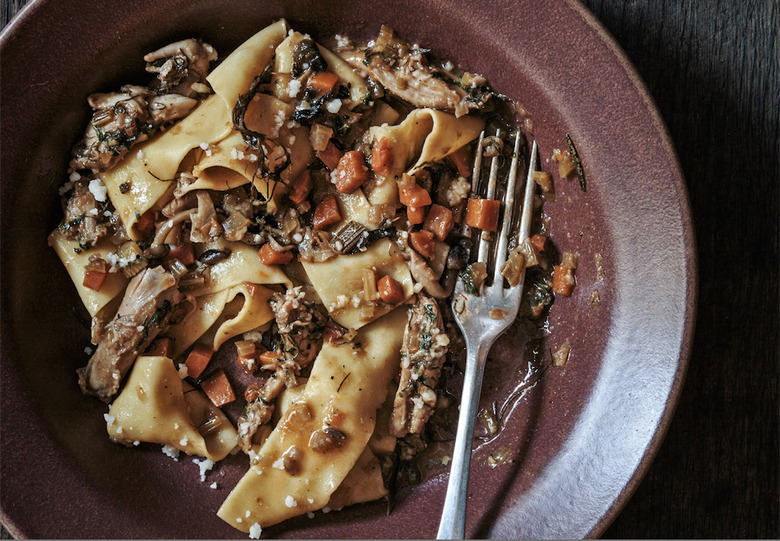
Sugos are Italian meat sauces often made with braised bone-in meat, hand-torn and reintroduced, plump and supple, back into the lush sauce. Way more interesting than your standard ragu, which calls for ground meat, a sugo has a mix of inviting, soft textures. This one, made with a rich chicken broth, is meaty and balanced with sweetly caramelized vegetables.
With lean, muscular cuts like these slightly gamy rabbit legs, it's easy to know when you've cooked the meat perfectly because it shrinks and puffs on the bone; at that moment, it's bouncy, juicy, and just the tiniest bit tense. If you look closely enough, you'll spot natural seams in the meat; follow those lines when pulling off smooth, tender bites.
Tossed with pappardelle, this sugo is a home-run meal that's versatile year-round. In the winter, I like to add more meat, and in the summer I scale back on the meat a bit and add some fresh vegetables, like peppery arugula, at the last minute. In the spring, favas are a go-to, and in the early fall it's fresh tomatoes. If rabbit makes you squeamish, or if it's hard to find, chicken legs may be used instead.
HOW TO PLAN THIS MEAL:
2-3 days before: Dry-brine rabbit legs. Make chicken broth.
36 hours before: Rinse and dry rabbit legs.
12-24 hours before: Braise rabbit legs. Pull meat and let sugo rest. Make pappardelle dough.
3 hours before: Roll and cut pappardelle. (Pasta can also be cut up to 3 days before and frozen.)
30 minutes before: Gently rewarm sugo.
10 minutes before: Boil pappardelle. Toss noodles with sauce and dress dish.
- 1 tablespoon black peppercorns
- 1 tablespoon fennel seeds
- 1 tablespoon coriander seeds
- 1/4 cup kosher salt
- 1 teaspoon finely grated lemon zest (from 1 lemon)
- 2 teaspoons finely grated orange zest (from 1 orange)
- 2 tablespoons roughly chopped fresh oregano leaves
- 2 pounds skinless rabbit hind legs (about 4 legs) or chicken legs
- 1/4 cup dried porcini mushrooms
- 1/2 teaspoon sugar
- olive oil
- 1/2 cup very finely diced red onion
- 1/4 cup very finely diced fennel
- 3 tablespoons fennel fronds
- 1/2 cup finely diced carrot
- 1/4 cup very finely diced celery
- 4 garlic cloves
- 1 tablespoon tomato paste
- 2 tablespoons champagne vinegar
- 3 cups chicken broth
- 1 pound Fresh Pappardelle
- 1 1/2 tablespoons butter
- 3 tablespoons finely sliced fresh flat-leaf parsley leaves
- 2 cups all-purpose flour
- 1/2 cup semolina flour
- 1/4 teaspoon kosher salt
- 3 large eggs
- 2 to 3 tablespoons cold water
- :::pappardelle:::
- In a medium bowl, whisk together the 00 flour, semolina, and salt. Dump the dry mixture out onto a clean work surface, forming a mound, and punch a 3-inch-wide well in the center. In a small bowl, beat the eggs and water until well combined. Pour the egg mixture into the center of the well.
- With a fork, whisk the eggs while slowly scraping in the flour from the well’s sidewalls. Take time—a full minute—to slowly and thoroughly whisk the dry into the wet ingredients, until a shaggy dough forms.
- With the base of your palm, knead the dough, working it back and forth until a smooth, slightly marbled, damp mass comes together. Form the dough into a ball and wrap it in plastic. Refrigerate the dough, ideally for at least 12 hours, or until it holds a thumb imprint for 10 seconds after you press it.
- Remove the dough from the refrigerator and let it come up to room temperature, about 45 minutes. Cut the dough into 6 equal pieces and cover them with a lightly dampened kitchen towel.
- Lightly dust a clean work surface with 00 flour. Place 1 piece of dough on the floured work surface and lightly dust it as well.
- Turn on your pasta machine, if it is automatic. Set the machine’s rollers to the thickest setting on the dial, so they are about 1/4 inch apart. On most machines, the largest setting is #1. Pass the dough through the machine. Now, turn the dial one setting thinner (#2) and pass the pasta through the machine once more. Keep the machine on without changing the settings.
- Lay the pasta sheet back down on the floured surface and lightly redust it with flour. Fold a third of the stretched pasta dough back over itself. Then fold the sheet’s other end back over the center portion as well. The idea is to fold the dough into thirds and create straight edges.
- Pass the folded dough through the rollers once more at the #2 setting. Turn the dial to #3 and pass the pasta sheet through this thinner setting once.
- Refold your pasta sheet into thirds as detailed above, making sure that the folded pasta is not wider than the roller.
- Pass the folded pasta through setting #3. Turn the dial down to #4 and pass the pasta through this thinner setting. Turn the dial to #5 and put the pasta sheet through this thinnest setting for a final pass. This should yield a pasta sheet about as thick as construction paper.
- When done, the stretched pasta sheet should feel a bit damp and have the rough texture of a cat’s tongue. Those tiny ridges help the sauce to adhere to the noodle.
- Lay the long pasta sheet out flat on the work surface. Working from one end to the other, cut crosswise through the sheet at 6-inch intervals. You should end up with approximately six 6-inch pasta sheets.
- Line a large baking sheet with parchment paper and lightly dust it with flour.
- Roll one of the pasta sheets into a long tube. Slice the tube crosswise at 1 1/2-inch intervals. Unfurl the roll and scatter the noodles, which should be approximately 6 × 1 1/2 inches, onto the baking sheet. Repeat with the remaining pasta sheets.
- Repeat the entire pasta rolling process with the remaining balls of pasta dough. The pappardelle will hold at room temperature for about 3 hours. Afterward, the cut pasta will keep in the freezer, in an airtight container, for 3 days.
- :::rabbit legs:::
- In a small bowl, mix the cracked pepper, fennel and coriander seeds, kosher salt, lemon and orange zest, and oregano until well combined.
- Lay the rabbit legs on a rimmed baking sheet and thoroughly rub the meat with the salt mixture. Arrange the legs in a single layer and transfer to the refrigerator. Dry-brine the rabbit, uncovered, for 24 hours.
- Rinse the legs under cold water, washing off all the salt rub. Blot them dry with paper towels and transfer to a cooling rack set over the baking sheet. Refrigerate the legs, uncovered, for 6 to 12 hours, or until the meat feels dry and tacky.
- :::porcinis:::
- Meanwhile, place the dried porcinis and sugar in a small bowl. Cover with 1 cup warm water and let soak for 1 hour, or until they plump and tenderize. Lift the mushrooms out of the water and transfer to a fine-mesh sieve. Hold the sieve over the bowl with the soaking liquid and press down on the mushrooms to capture their juices below. Set the bowl aside and finely chop the rehydrated porcinis.
- :::braise:::
- Preheat the oven to 300°F. Set a large Dutch oven over medium-high heat and swirl 2 tablespoons olive oil into the pot. Once the oil is shimmering-hot, lay in 2 of the legs, working in batches to avoid overcrowding. Brown the legs for 4 minutes on each side, or until they easily release from the pot and turn a deep, golden brown. Transfer the browned legs to a platter. Repeat with the remaining legs, adding more oil if necessary.
- Pour off all the fat from the pot, making sure to leave the fond in place. Set the pot back over medium-low heat and swirl in 3 tablespoons olive oil. When the oil is hot, stir in the onion, diced fennel and fennel fronds, carrot, celery, and garlic. Sauté the vegetables, taking care to stir and scrape up all the fond, for 15 minutes, or until the soffritto collapses and softens. Increase the heat to medium and stir in the tomato paste. Sauté the soffritto for 3 to 5 minutes more, or until the paste darkens. Stir in the chopped porcinis and sauté for 4 minutes, or until aromatic.
- Pour in the vinegar and reserved porcini water. (If any grit has gathered in the porcini water, pass it through a cheesecloth-lined strainer before using.) Simmer the liquid for 10 minutes, or until it mostly evaporates.
- Return the browned legs to the pot, arranging them in a single layer so their meatiest side faces up. Smear the soft vegetables all over the meat and increase the heat to medium-high. Pour in enough chicken broth so two-thirds of the legs are submerged. Bring the liquid up to a simmer, then cover the pot and transfer it to the oven.
- Gently braise the legs for 1 1/2 hours, or until the legs’ thickest portions are tender but a little bouncy when prodded. Every 20 minutes, uncover the pot, baste the legs, re-cover the pot, and rotate it 90 degrees. When the meat is perfectly cooked, remove the pot from the oven, uncover, and let the legs cool in their braising liquid until they are cool enough to handle, at least 1 hour. (For faster cooling, set your pot in a sink filled with ice water.)
- :::meat:::
- Working with one leg at a time over a medium bowl, pick the meat off the bone: Hold a leg at its joint with one hand. With your other hand, gently pull the meat along its natural seams; it should flake off in bite-size pieces. When breaking larger pieces into smaller bites, avoid shredding. Instead, pull off smooth, plump bites. Repeat with the remaining legs. Set the picked meat aside and discard the bones.
- Stir the picked meat back into the pot. The meat should be just barely submerged. If there’s too much liquid, you can gently reduce it when reheating the sauce, just before combining it with the pasta. Stir the sugo and season to taste with salt and pepper. Cover, refrigerate, and let rest for at least 6 hours. At this point, the sugo will hold for 2 to 3 days in the refrigerator.
- :::sugo and pappardelle:::
- Remove the sugo from the refrigerator and bring it up to a gentle simmer over medium heat.
- Meanwhile, bring a large pot filled with well-salted water to a rolling boil over high heat. Just before dropping in the pasta, taste the water to make sure it is pleasantly salty. Drop in the pappardelle and boil for 2 minutes, or until it whitens but is not yet al dente. As the pasta cooks, raise the heat under the sugo to medium-high.
- Scoop out a cup of the pasta water and reserve. Quickly drain the pasta and add it to the simmering sugo. Gently toss the noodles in the sugo for 1 to 2 minutes, or until the pasta is just al dente. If the dish looks too dry, meaning the noodles do not glisten, add small splashes of the reserved pasta water. When the noodles are al dente, remove the pot from the heat and stir in the butter, 1 tablespoon olive oil, and the parsley. Serve immediately.