How To Cook With Pig, Chicken And Cow Feet. And Why.
Food Republic's column Ask Your Butcher seeks to answer FAQs in the world of butchery. Ethically minded butcher Bryan Mayer has opened butcher shops and restaurants and has trained butchers in the U.S. and abroad. He helped develop the renowned butcher-training program at Fleisher's. Today, he consults with farmers, butchers, chefs and anyone else who will listen. In each column, Mayer tackles a pressing issue facing both meat buyers and home cooks. This week, he takes some time to discuss an oft-overlooked cooking ingredient: feet.
When we talk about eating "whole animal," some may make the assertion that it's not really whole animal. We often leave out organs, blood, heads and, yes, feet. We buy our animal shares or support our local whole-animal butcher shops but often come away with the same items: a steak here, a roast there. And while it's often difficult to get these parts, the more we demand them, the more likely they'll be available from our trusted sources.
By the time we're done with this column, I hope that I will have done my part in helping to increase the demand for feet. We've got a bit of a strange relationship with this part of the body. Perhaps it's because we keep them covered so much of the time that we don't truly understand them. We're always "getting cold feet" or having our "feet swept out from under us." Then there's my personal favorite, having all that "grass grow under your feet." So much negativity! Idioms aside, feet from hogs, chickens or cattle can be part of or even an entire meal. Let's make cooking with feet less of an Achilles heel... Sorry, but I just had to.
Pig Feet

Pig feet are popular pretty much everywhere, except where they're prohibited by dietary laws. And for good reason. There's meat, fat, bones, tendon and all that natural gelatin — or, as I like to say, flavor — waiting to be released. Toss a few pig feet in with your chicken bones and you're on your way to a tonkotsu ramen broth. If you're tired of adding bacon fat to everything, why not try something called trotter gear? Fergus Henderson's pig foot–infused broth with vegetables and Madeira adds an intense richness to almost any dish.
You can always go the pickling route. If you can make a stew, you can pickle some feet. And with all that protein and collagen providing your skin with strength and resilience, you'll be looking young forever! I make no claims. For me, it's on the grill. We need to braise them first, to break down all that connective tissue. A deep baking dish or a hotel pan if you happen to have one, water, sriracha and some apple cider is all you need to get started. About 3 hours at 300°F in your oven should get them tender, but not falling off the bone. We don't want that. Get your grill going, brush them lightly with a bit of honey, and in about 30 minutes you've got something way better than chicken wings!
Grilled Pig Feet With Honey Glaze
Ingredients
5 pig feet from fully pastured/woodlot pigs. (You'll want your butcher to split them for you or, if you're up for it, feel free to do this yourself. With a sharp knife and a bit of pressure, cut between the bulbs and the declaws. Basically, cut down the middle of the foot.)
1/2 cup apple cider vinegar
1/4 cup sriracha
2 teaspoons of salt
1/2 cup of water
Honey, for basting
Directions:
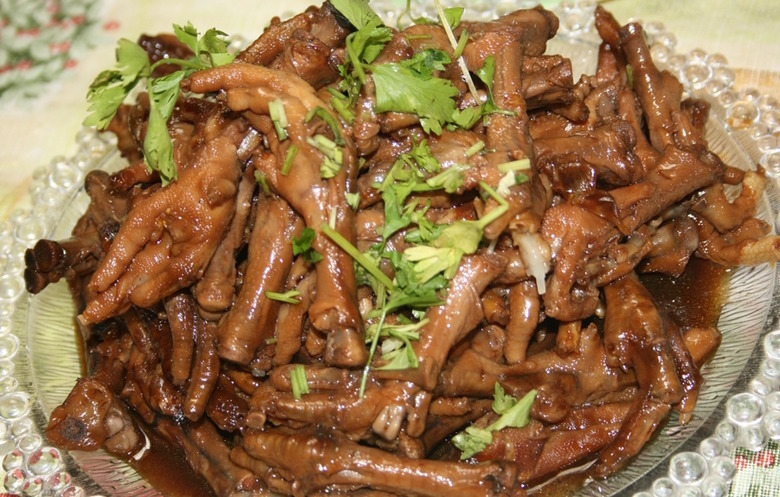
Chicken Feet

Consisting of mostly skin and tendon, chicken feet clearly differ from pig feet, but they are no less useful. I don't make a chicken stock without at least a couple of them in there to — you guessed it — add depth of flavor and some thickness, not to mention lots of trace minerals and calcium. Eaten throughout Asia, Eastern Europe and South America, there are no shortages of ways to prepare them. And when I'm at a dim sum restaurant, I can't wait for that cart with the chicken feet. Okay, tripe, too. Dim sum might not be the best way to get someone on the fence about eating feet to partake, but I think I've got something for you all — spicy chicken Adidas. Or what is commonly known as Filipino spicy fried chicken feet. They're spicy due to adding as much red pepper as you'd like and they are called Adidas because, well, Filipinos are awesome and have awesome senses of humor! You'll start by frying first and braising second, which seems counterintuitive. But it's not. This method will prime them for taking on all that flavor we're going to add.
Spicy Filipino Chicken Adidas
Ingredients
2 pounds of chicken feet from free-roaming, fully pastured birds
2 tablespoons soy sauce
2 tablespoons oyster sauce
1/4 cup green onions
2 tablespoons cornstarch (diluted in 1/2 cup water)
1 tablespoon brown sugar
Ginger (roughly the size of a quarter, cut into strips)
1 tablespoon garlic, minced
Red pepper (to desired heat)
3 cups water
1 cup oil
Directions:
Cow Feet

Cow feet are probably the most difficult of the three to procure, which is unfortunate. And if you've had any apprehension about eating feet, I've got news for you — if you've had Jell-O, you've definitely had some feet (and hides) and some other bones. Where else do you think all that protein-rich collagen comes from? Your best bet for finding cow or calf feet is to ask your local whole-animal butcher shop or to find a farmer you trust at a farmers' market. If you don't, you'll never get to make Bull Foot Soup. And after the storm we had here in the East over the weekend, who couldn't use a hearty bowl of soup? This soup is a staple in any Caribbean kitchen. And like any dish that's been passed down from generation to generation, there can be many variations. I stick with a basic version that requires just about four hours of cooking, for one of the heartiest soups you can eat.
Bull Foot Soup
Ingredients
5 pounds total of beef feet, neck and knuckle bones cut into small 2-inch pieces
1 cup yellow split peas
1 onion, peeled and diced
1 bay leaf
2 sprigs of thyme
1 teaspoon salt
2 tablespoons olive oil
3 carrots, cut into 1-inch pieces
2 russet potatoes, cut into 1-inch pieces
8-10 whole okra
2 cloves of garlic, peeled and diced
2 scallions, peeled and diced
1 Scotch bonnet pepper
Directions:
And there you have it — three ways to love feet, perhaps even more than Andy Warhol. [Editor's note: Warhol, perhaps, but not Rex Ryan!]